I have been playing Pokemon Pokopia since launch day, and I want to be upfront about something: I almost skipped the Sableye event because I did not fully understand how the currency system worked. That cost me a few exclusive furniture pieces I still regret missing. So when The Pokemon Company announced the Wish Upon a Jirachi event for June 23 to July 8, 2026, I sat down and put together the most complete guide I could find anywhere, including the one thing most sites skip entirely: the full controller button layout for Switch 2, PC, and Xbox.
This article covers every confirmed reward, how the Sparkling Wish Notes system actually works, what you need to prepare before June 23, and a detailed control reference you can bookmark and come back to anytime.
What the Wish Upon a Jirachi Event Actually Is
Pokemon Pokopia runs limited time events that let you meet a featured Pokemon, collect exclusive event currency, and spend that currency on themed furniture and decorations. The Jirachi event follows this same structure but adds a crafting conversion step that earlier events did not have.
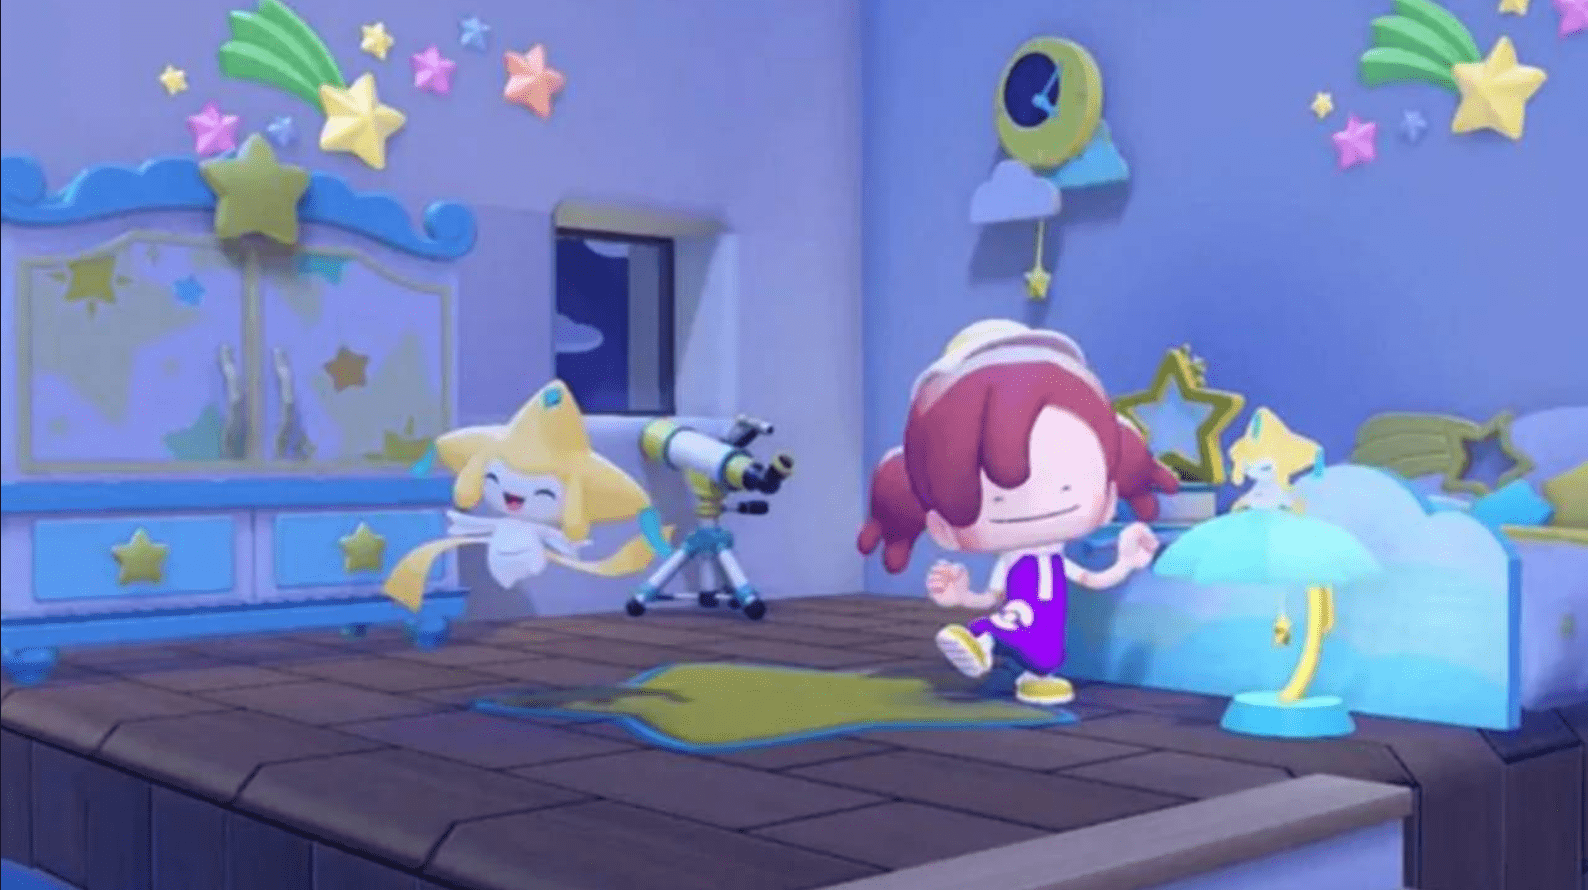
The basic loop works like this. You talk to Jirachi to receive a recipe for Wish Notes. You then interact with other Pokemon living in your town and fulfill their requests. Completing those requests converts your standard Wish Notes into Sparkling Wish Notes. Those Sparkling Wish Notes are what you actually spend at the Pokemon Center to claim the event furniture.
One important detail that is easy to overlook: the official Pokemon Company announcement states that Jirachi only visits towns that have a fully rebuilt Pokemon Center. If you are a newer player who has not completed that construction yet, you have until June 23 to get it done. Without it, you cannot start the event at all.
Event Dates and Times: Do Not Get Caught Off Guard
The event goes live on June 23, 2026 at 5:00 AM local time and closes on July 8, 2026 at 4:59 AM local time. That gives you exactly fifteen days of playtime. The start and end time is tied to your local timezone, so every region gets the same amount of time regardless of where you live.
There is one more thing worth knowing. The time travel exploit that worked for the Sableye event no longer functions for Wish Upon a Jirachi. As of the Ver 1.1.0 update, changing your Nintendo Switch 2 system date no longer skips you ahead in Pokopia events. The only way to participate is to play through the event in real time between those dates.
Two weeks sounds generous, but the furniture set has multiple items and the conversion process for Sparkling Wish Notes requires fulfilling individual Pokemon requests. Starting on day one and checking in regularly is a much better approach than trying to grind everything at the end.
All Confirmed Wish Upon a Jirachi Event Rewards
The Sparkling Wish Notes you collect can be exchanged directly with Jirachi at any active Pokemon Center in your town. The confirmed furniture rewards tied to this event are all decorated with the same blue, mint, yellow, and white color palette that matches Jirachi’s own visual design. Based on promotional screenshots and current reporting from Bonus Action, the full furniture set includes the following items.
- Jirachi Bed – A star themed bed with crescent moon accents, perfect for a bedroom setup
- Jirachi Table – A small decorative table in the event color palette
- Jirachi Vanity – A dresser or vanity unit decorated with starlight motifs
- Jirachi Wardrobe – A closet piece that completes the bedroom collection
- Jirachi Lamp – A glowing lamp that fits the nighttime sky theme of the event
- Jirachi Rug – A decorative floor rug with star patterns
- Jirachi Telescope – A functional decoration piece that fits the space and stargazing aesthetic
- Jirachi Cannon – A small decorative cannon that doubles as a whimsical centerpiece
When you put the entire set together in a single room, you get a fully themed space that looks like a cozy bedroom inside an observatory. The event screenshots show the whole collection arranged in a warm interior alongside a Jirachi and a Ditto player character. Every piece pairs naturally with the others, which makes this one of the more cohesive reward sets the game has had so far.
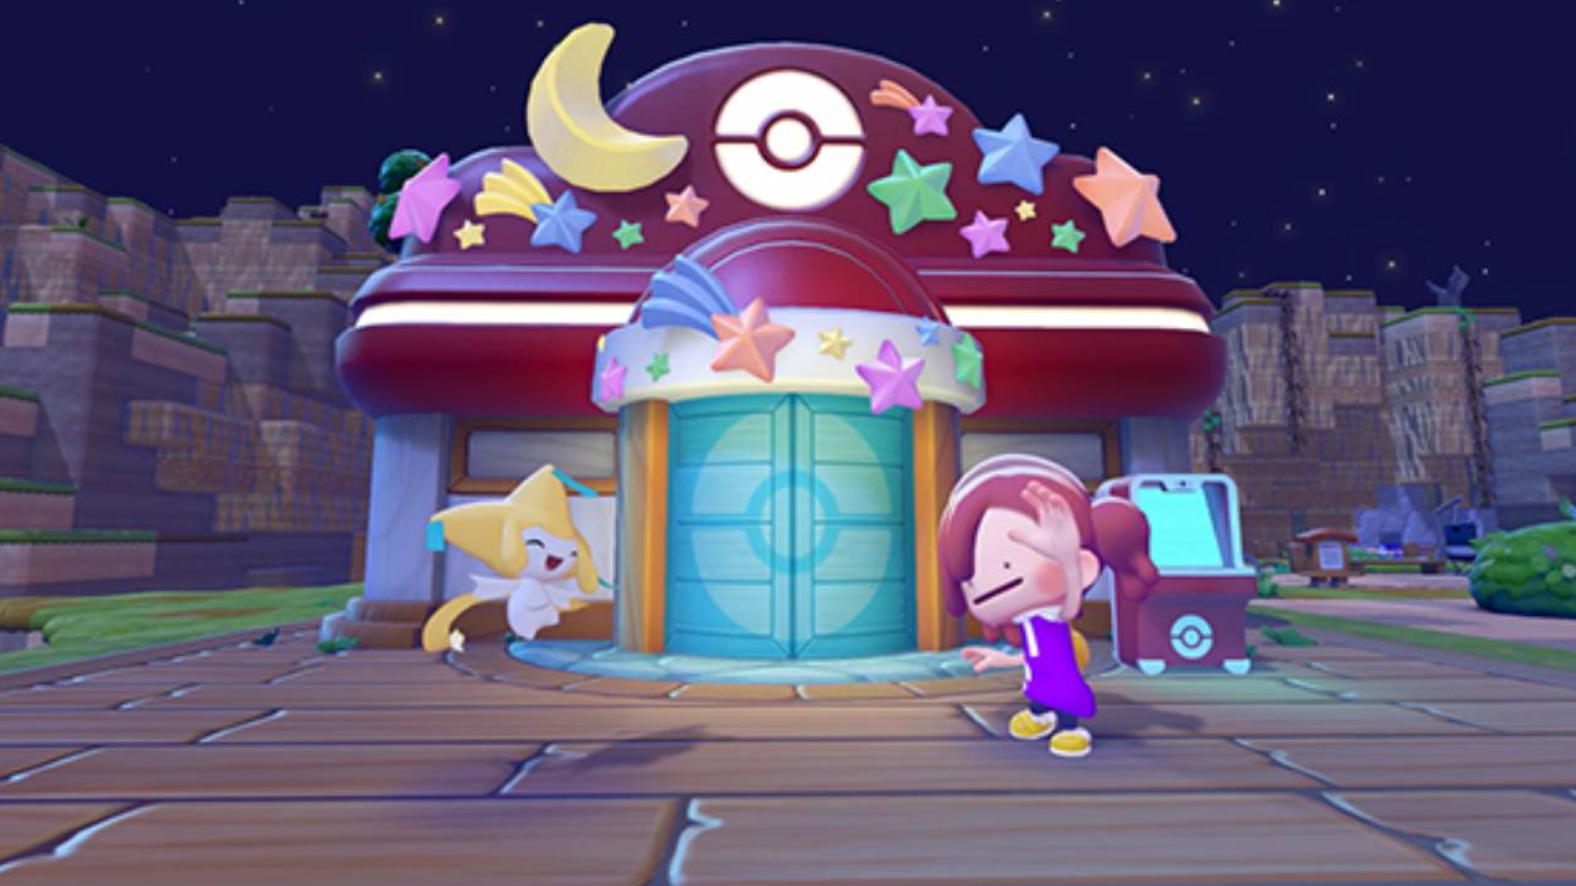
The Pokemon Center itself also changes appearance for the duration of the event. The building exterior gets decorated with crescent moons and stars, giving it a late night wishful look that matches the Jirachi theme. This is consistent with how previous events handled the Sableye and Hoppip showcases.
How to Get Sparkling Wish Notes: Step by Step
This is where most guides are vague, so let me be specific about what the current information tells us.
Step one is talking to Jirachi at your Pokemon Center to receive the Wish Note recipe. This unlocks the event crafting mechanic. Step two is interacting with the Pokemon living in your town and fulfilling their requests. These are the NPC request tasks that appear when you speak to residents. Completing them is the mechanism that converts your basic Wish Notes into Sparkling Wish Notes. Step three is returning to Jirachi at the Pokemon Center and exchanging your Sparkling Wish Notes for furniture pieces.
You can use any fully built Pokemon Center in your town as an exchange location, so if you have multiple towns set up, you have more flexibility. The conversion does require active engagement with your Pokemon residents rather than passive collection, which means the event rewards players who check in consistently over the two weeks rather than binge playing on a single day.
A personal tip from my experience with the Sableye event: treat the Pokemon requests like daily tasks. Log in, work through the available requests from your residents, convert your notes, then log out. Ten to fifteen minutes a day across fifteen days will get you the full furniture set without any stress at all.
Why This Event Matters More Than the Others
Jirachi is a Mythical Pokemon that has never been available in Pokopia outside of this event. That alone makes it worth logging back in. But the event also introduces the crafting conversion mechanic, which is new. Earlier events gave you currency through simpler means. This one asks you to go one step further by working with your Pokemon neighbors to upgrade the currency itself.
That extra step is not a grind. It is actually a design decision that forces you to re-engage with the residents you might have stopped talking to after finishing their initial requests. Spending time with the Pokemon already living in your town to unlock access to a Mythical Pokemon visitor is thematically consistent with everything Pokopia is about.
There is also the timing. The summer Expansion Pass DLC is coming later this year, with the first drop introducing an underwater town called Bubbly Basin. The Jirachi event bridges the gap between now and that content drop, and the GosuGamers coverage of the announcement noted that the expansion pass artwork contains sparkles that closely resemble the shiny Pokemon icon used across the franchise, which has sparked speculation about shiny variants eventually coming to Pokopia. Nothing is confirmed, but if shiny Pokemon are coming, the star-themed Jirachi event feels like a deliberate setup.
Preparing Your Town Before June 23
There are a few things worth doing before the event starts so you can jump straight into collecting on day one.
First, make sure you have at least one fully rebuilt Pokemon Center. This is a hard requirement. Jirachi cannot visit your town without one, and the game will not let you interact with the event at all if this is not in place.
Second, clear out your active Pokemon requests before the event starts. Going into June 23 with a backlog of unfulfilled requests could slow down your early Sparkling Wish Note production since new requests from Jirachi-related interactions will need space in your queue.
Third, stock your crafting stations. Screenshots show the conversion happening at a crafting bench, so having your workbench accessible and your materials organized will save you time during the event.
Fourth, check your storage. If you have been hoarding furniture from earlier events, take a few minutes to organize your storage using the frame system before June 23. A clean inventory makes it easier to track which new event pieces you have collected and which ones you still need.
Full Pokemon Pokopia Controller Button Layout Guide: Switch 2, PC and Xbox
This section exists because every guide I found while preparing for previous events buried the controls or scattered them across multiple pages. Here is the complete reference in one place.
Pokemon Pokopia is a Nintendo Switch 2 exclusive, which means the primary control scheme is built around the Joy-Con 2 and the Pro Controller. However, the game is also playable on PC via emulation, and many players use Xbox controllers through tools like Steam Input or JoyToKey. The control logic maps consistently across devices once you understand which button does what.
Nintendo Switch 2 Default Controls: Main Gameplay
| Action | Switch 2 Button |
|---|---|
| Move Character | Left Stick |
| Camera Control | Right Stick |
| Jump | A Button |
| Interact / Confirm | A Button |
| Cancel / Back | B Button |
| Sprint (Hold) | B Button (hold) |
| Use Move / Action | Y Button |
| Switch Move | X Button |
| Open Inventory | ZL Button |
| Strafe (Hold) | ZL Button (hold) |
| Use Item / Tool | ZR Button |
| Open Pokedex / Main Menu | Plus (+) Button |
| Open Map / Minimap | Minus (-) Button |
| Quick Access Left | L Button |
| Quick Access Right | R Button |
| D-Pad Up | Quick select item up |
| D-Pad Down | Quick select item down |
| D-Pad Left | Quick select item left |
| D-Pad Right | Quick select item right |
| Camera Reset | Right Stick Click (RS) |
| Crouch or Look Down | Left Stick Click (LS) |
Nintendo Switch 2 Default Controls: Furniture Placement Mode
| Action | Switch 2 Button |
|---|---|
| Rotate Furniture Left | L Button |
| Rotate Furniture Right | R Button |
| Adjust Height Up | ZR Button |
| Adjust Height Down | ZL Button |
| Confirm Placement | A Button |
| Cancel Placement | B Button |
| Flip Furniture | X Button |
Nintendo Switch 2 Default Controls: Inventory Screen
| Action | Switch 2 Button |
|---|---|
| Navigate Items | Left Stick or D-Pad |
| Select Item | A Button |
| Drop / Discard Item | Y Button |
| Sort Inventory | X Button |
| Close Inventory | B Button or ZL |
| Switch Tabs | L and R Buttons |
Mouse Mode Controls: Switch 2
Mouse Mode is one of the Switch 2 features that Pokopia actually uses well. To activate it, press the Plus button to open the main menu, go to Settings, and enable Mouse Mode under the Game tab. Then remove one Joy-Con 2 from the console, attach the wrist strap, and hold it with the colored sensor facing downward on a flat surface. A cursor will appear on screen.
| Action | Mouse Mode Button |
|---|---|
| Move Cursor | Physical mouse movement of Joy-Con |
| Primary Click (Right Controller mode) | R Button |
| Secondary Click (Right Controller mode) | ZR Button |
| Primary Click (Left Controller mode) | L Button |
| Secondary Click (Left Controller mode) | ZL Button |
| Rock Smash (only move available) | Primary Click button |
| Place Block | Primary Click on target location |
| Exit Mouse Mode | Reattach Joy-Con or toggle in Settings |
Mouse Mode is most useful when you are doing precise building work or trying to break a single specific block without accidentally hitting something next to it. In standard analog stick mode, aiming for a single block inside a dense structure is frustrating. Mouse Mode removes that problem entirely. The only limitation is that you can only use Rock Smash while in Mouse Mode, so you need to switch back to regular controls for any other move.
Personal note: I use Mouse Mode almost exclusively when designing indoor spaces. Placing furniture items with pixel level accuracy using a cursor makes a real difference in how the final room looks. The analog stick just cannot match that precision for interior decorating work.
Xbox Controller Layout for Pokemon Pokopia on PC
If you are playing Pokemon Pokopia on PC via emulation or a future official release, an Xbox controller maps cleanly to the Switch 2 control scheme. The mapping below is based on the standard Nintendo-to-Xbox button translation used by most Switch emulators and Steam Input profiles.
| Switch 2 Button | Xbox Controller Equivalent | Action in Pokopia |
|---|---|---|
| A Button | B Button | Jump / Confirm / Interact |
| B Button | A Button | Cancel / Back / Sprint (hold) |
| X Button | Y Button | Switch Move / Flip Furniture / Sort |
| Y Button | X Button | Use Move / Drop Item |
| L Button | LB (Left Bumper) | Quick Access Left / Rotate Furniture Left / Switch Tab |
| R Button | RB (Right Bumper) | Quick Access Right / Rotate Furniture Right / Switch Tab |
| ZL Button | LT (Left Trigger) | Open Inventory / Strafe / Height Down |
| ZR Button | RT (Right Trigger) | Use Item or Tool / Height Up |
| Left Stick | Left Stick | Move Character |
| Right Stick | Right Stick | Camera Control |
| Left Stick Click | LS Click | Crouch / Look Down |
| Right Stick Click | RS Click | Reset Camera |
| Plus (+) Button | Start / Menu Button | Open Pokedex and Main Menu |
| Minus (-) Button | Back / View Button | Open Map |
| D-Pad Up | D-Pad Up | Quick Select Item Up |
| D-Pad Down | D-Pad Down | Quick Select Item Down |
| D-Pad Left | D-Pad Left | Quick Select Item Left |
| D-Pad Right | D-Pad Right | Quick Select Item Right |
One thing worth knowing about the Xbox to Switch mapping: Nintendo and Xbox swap the positions of the confirm and cancel buttons. On Switch, A confirms and B cancels. On Xbox following the same layout, A is placed where B is on Nintendo, so most emulators apply a cross-swap. If your controls feel inverted when you first connect an Xbox controller, check your emulator’s button mapping settings and make sure the A and B swap is applied correctly.
PC Keyboard Default Controls for Pokemon Pokopia Emulation
For players who prefer keyboard and mouse, here is the standard keyboard mapping used when running Pokemon Pokopia through Switch 2 emulation software. These are the most common defaults, though most emulators let you reassign every key.
| Action | Default Keyboard Key |
|---|---|
| Move Forward | W |
| Move Backward | S |
| Move Left | A |
| Move Right | D |
| Jump / Confirm | Space or Enter |
| Cancel / Back | Escape or Backspace |
| Use Move | F |
| Switch Move | Q |
| Open Inventory | Tab |
| Use Item | E |
| Open Main Menu | Enter or P |
| Open Map | M |
| Camera Rotate Left | Left Arrow |
| Camera Rotate Right | Right Arrow |
| Camera Up | Up Arrow |
| Camera Down | Down Arrow |
| Strafe Left | Hold Shift + A |
| Strafe Right | Hold Shift + D |
| Sprint | Hold Shift |
| Quick Item Select 1 | 1 |
| Quick Item Select 2 | 2 |
| Quick Item Select 3 | 3 |
| Quick Item Select 4 | 4 |
If you use a keyboard for building work specifically, I recommend reassigning your camera controls to the mouse rather than the arrow keys. Pokopia’s building system benefits a lot from being able to move the camera freely while your left hand handles movement. Most emulators support this kind of hybrid input without much configuration work.
Custom Button Remapping in Pokemon Pokopia
The game itself allows you to remap most button assignments. To access this, press the Plus button during gameplay to open the main menu, then select Settings and navigate to the Game tab. Almost every control can be changed here. Greyed-out buttons are locked by the system and cannot be reassigned, but the vast majority of actions are fully adjustable.
The two remaps I personally recommend: first, if you find holding B to sprint uncomfortable while simultaneously managing the right stick camera, swap sprint to a trigger. Second, if you do a lot of indoor furniture placement, consider putting your most used rotation controls somewhere you can access without looking down at the controller.
What the Summer DLC Means for the Jirachi Event
The Pokopia Expansion Pass costs $34.99 and the first content drop is scheduled for summer 2026. It adds an underwater town called Bubbly Basin and requires completing a specific request at Bleak Beach before you can access it. A free software update in August will add the Dive move needed to enter that town.
The Jirachi event runs from June 23 to July 8, which puts it directly before that summer DLC window. If you are someone who picked up the game at launch and then stepped away, this event is the perfect reason to come back and also get your town ready for the expansion content. Nintendo’s official Pokopia page has the full expansion details for anyone who wants to review what is included before purchasing.
Players who have not yet raised their environment level at Bleak Beach should prioritize that alongside the Jirachi event this month. Both activities run at the same time, and completing one does not block the other.
Jirachi in Pokemon Lore: Why This Event Has Extra Meaning
Jirachi is a Steel and Psychic type Mythical Pokemon first introduced in Generation III. It is associated with wishes, stars, and a once-in-a-thousand-years awakening. In the main series games, Jirachi grants wishes when it awakens, which happens only briefly and rarely. Its signature move is Doom Desire, and it carries seven tags on its body that are said to contain wishes from humans.
The Pokopia event leans into all of this mythology. The Wish Notes you collect are literally wishes in item form. Converting them into Sparkling Wish Notes through cooperation with other Pokemon mirrors the idea of wishes being amplified or made real through community effort. The nighttime star and crescent moon aesthetic of the event furniture and the Pokemon Center decoration all connect back to Jirachi’s original lore.
This is the kind of thematic depth that makes Pokopia events feel different from generic seasonal content. The design team is not just slapping a Pokemon onto a random item set. They are building the entire event experience around what that Pokemon represents in the broader franchise context.
Tips to Maximize Your Jirachi Event Rewards
Here is a consolidated list of practical advice based on experience with every previous Pokopia event.
Start on June 23 rather than waiting. The event runs fifteen days but some furniture items may require more Sparkling Wish Notes than others. Getting a head start means you are never pressured at the end.
Fulfill Pokemon requests daily. The conversion from Wish Notes to Sparkling Wish Notes happens through NPC requests, so your rate of Sparkling Wish Note production is directly tied to how often you interact with your residents. A short daily session beats an occasional long one.
Use multiple Pokemon Centers if you have them. Any active Pokemon Center works as an exchange point, so you do not need to travel to a specific location each time you want to redeem rewards.
Do not ignore your crafting station placement. The event screenshots show crafting happening at a workbench. Keeping that workbench near your Ditto’s home base lets you fast travel there quickly and start converting notes without wasting time walking across your town.
Take photos for the memory. The Jirachi Pokemon Center exterior with its crescent moon and star decorations is a limited time visual that only exists during this event. Use the in-game photo mode to capture it. Just remember that Pokemon Pokopia photos do not automatically save to your Switch 2’s storage. You need to manually export them through the game’s capture menu, otherwise they stay locked inside the game’s own limited photo library.
Community Reaction and What Players Are Saying
The Pokemon Pokopia community has been very positive about the event announcement. The furniture set in particular is drawing attention because the color palette is cohesive and the full bedroom collection lets you theme an entire room around Jirachi without mixing in pieces from other sets. That is something earlier events did not fully achieve.
There is some light criticism around the removal of the time travel exploit. Players who used it for earlier events to collect items early will not have that option here, and a few in the community feel the two-currency system adds an unnecessary extra step. I personally think the conversion mechanic is a net positive because it gives you a reason to actually talk to your Pokemon residents instead of just collecting resources passively, but the debate is real and worth acknowledging.
The expansion pass artwork that possibly hints at shiny Pokemon has also generated significant discussion. Serebii’s Pokopia event tracker is already documenting the Jirachi event details as they come in, and it is a good resource to watch for any mechanic updates or reward additions that get confirmed closer to launch.
Should You Come Back for This Event
Yes. If you played Pokopia at launch and have not logged in for a while, this is one of the better reasons to return. Jirachi is not available in the game outside of this event window. The furniture set is visually strong. The two-week timeframe is generous enough that you do not need to play intensively. And the event sets you up well for the summer DLC that is coming just a few weeks after it ends.
If you are a newer player who is still building out your town, the priority right now is getting at least one Pokemon Center fully constructed before June 23. Everything else, the crafting, the note conversion, the reward redemption, flows from that single prerequisite.
Jirachi has always been about making wishes come true through patience and the right timing. This event captures that spirit well. Two weeks, a few minutes a day, and you walk away with one of the most complete themed furniture sets the game has released. That is a wish worth making.